

Properly edited real estate images are the key to a large number of rent/ buy offers.
There’s a variety of methods you can adopt to edit real estate photos and ensure the properties you’re promoting look fantastic when posted on social networks and various notice boards.
We’ve listed in this article more than 15 tips on how you can get started:
1. Follow Social Media Photo Editing Requirements
Firstly, you have to look at the requirements presented by the social network you’ll be posting the images on. If you’ve decided to use Instagram for your real estate photos, then remember these parameters:
- Instagram images can have a square, horizontal, or vertical shape, but they all will be shown as squares in your feed.
- The perfect resolution for a square image is 1080×1080 with a 1:1 aspect ratio.
- Portrait photos need to have a resolution of 1080×1350 and a 4:5 aspect ratio.
Related: Updated Instagram Image Sizes and Aspect Ratio for 2022
Now, if you decided to use Facebook for posting your real estate pictures, then memorize these sizes:
- Cover image resolution: 820×312.
- Link photo resolution: 1200×630.
- Photo post resolution: 1200×630.
- Highlighted image resolution: 1200×717.
- Photo ad resolution: 1200×628.
2. Perform Color Correction
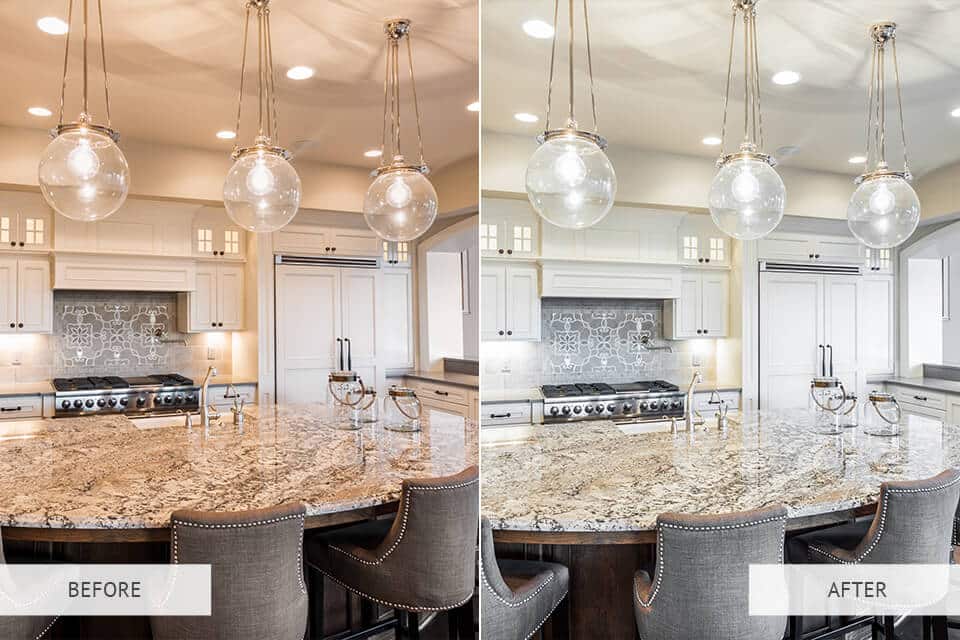
Interior lighting, external weather conditions, window tint, camera settings, and other factors can affect the color palette of your real estate photos. You can deal with that issue by doing color correction as long as you don’t change the colors so drastically that they completely differ from the original.
Both Photoshop and Lightroom let you breathe life into your images by performing color correction. Flat tones can be boosted to ensure your pictures look more eye-catching, and you can fine-tune the hue and saturation to make the colors in your real estate photos more natural. Keep in mind, though, that if you are using Photoshop, you will need to keep an eye on the accumulation of temporary data. Otherwise, it will not take too long before you noticed scratch disk-related errors, and it might take a while to resolve your scratch disk problem on the computer.
| Quick Tip: Another way to introduce color changes is to go to Color Balance settings. Pick Layer > New Adjustment Layer > Color Balance and move around the sliders, as you see fit. This feature lets you have more precise control over the shadows, mid-tones, and highlights, but it does demand a larger time investment. |
3. Adjust White Balance
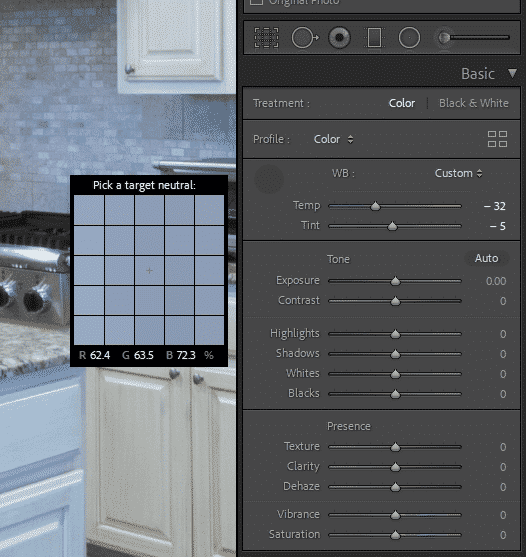
Cameras tend to struggle when they need to evaluate how much white color is in an image, which leads to it looking blueish or yellowish.
Dealing with this problem is very simple but remember that how you see the colors in your photos is both subjective and affected by the specific screen you’re using so don’t go overboard.
| Quick Tip: Employ the Eyedropper tool in Lightroom and adjust the temperature and tint, or simply let the software perform this task automatically. Remember to uphold the first rule of real estate image editing – have everything look as realistic as possible. |
4. Correct the Distortion
Lenses tend to bend and distort straight lines of the interior, creating a deformed look that doesn’t fully reflect reality. There are two main types of distortions you need to know about:
Barrel distortion leads to vertical lines being curved outward in the middle of the shot.
Perspective distortion makes the lines bend toward the center at a weird angle. This flaw is very simple to fix when working on real estate images in Photoshop so remember to locate and deal with any distortions you find.
| Quick Tip: To deal with distortion in Photoshop, choose the photo you need to adjust and press Filter > Distort > Lens Correction. Fix the distortion by moving the Remove Distortion slider to either side. |
5. Outsource Image Editing to Experts for Better Results

When you’re swamped with work as it is, it might be wise to outsource your real estate photo editing work. Simply request real estate photo editing services from a professional agency to save time and receive fantastic results.
We suggest you make use of the services provided by FixThePhoto, as they are one of the leading real estate image editing agencies worldwide, having satisfied thousands of clients over the 17 years that they’ve been helping them purchase, sell, and rent buildings thanks to quality retouched photos.
Their real estate photo editing services include object deletion, lawn retouching, sky manipulations, dirt & trash editing, TV picture replacement, fireplace addition, HDR effects, brightness and contrast tweaks, cord deletion, window cut-out manipulations, and lens distortion fix.
You can also look at their portfolios, browse through completed orders, study user reviews, and maybe contact some of the former customers. It’s always a great idea to go with an agency that specializes in editing the photography genre you’re working in.
As long as you explain what kind of result you want to receive, FixThePhoto will ensure the delivered photos match your expectations and can be posted on any platform you want.
6. Adjust the Shadows
When taking interior or exterior photos, you might run into the issue of unevenly spread light. You can deal with that problem by tinkering with the shadows, highlights, whites, and blacks in Lightroom.
Move the Shadows slider to the right to make them less intense, but don’t overdo it. If the highlights in the image are too strong, consider moving the corresponding slider to the left and making them subtler.
| Quick Tip: To fine-tune the whites and blacks, press and hold “Alt” on Windows or “Option” on Mac. Move the corresponding slider to the right until you notice white or black pixels in the photo. |
7. Work with Curves
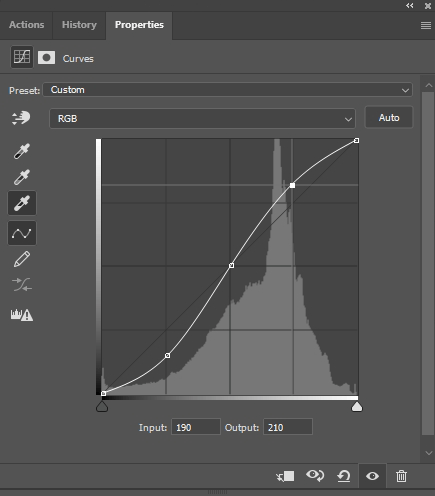
Curves is a fantastic tool included in Photoshop that can be used for performing color correction and enhancing the tones in your photos. That said, learning how to use this tool properly isn’t easy but that doesn’t mean you shouldn’t try. To access this feature, select Image > Adjustments > Curves and enable the Auto checkbox.
Move around the diagonal line, dragging it upward to boost the brightness and downward to make the image darker. Once you’re satisfied with the result, press OK. Feel free to adjust this setting in any way you want to get the look you’re going for.
8. Crop and Straighten
You can’t possibly edit real estate photos properly without ever resorting to cropping. This technique is primarily employed for ensuring the size and shape of the photo match the listing page. To achieve this, it’s important to use a digital photo editor tool that allows you to crop the photo and adjust its dimensions.
A social media post that features real estate pictures of different orientations and sizes can look very unprofessional. If you want to ensure potential clients see your real estate object in its full glory, it’s vital to ensure it occupies most of the frame instead of being dominated by the backdrop.
9. Crisp Up Your Pictures
Boosting the clarity of your photos can help improve their sharpness and deal with small out-of-focus issues. Lightroom allows tweaking this setting by going to the Clarity slider and moving it to the right. That said, you shouldn’t set this parameter too high since artificial sharpness can hurt the photo’s resolution.
10. Remove Unnecessary Objects
Objects like vehicles, trashcans, cords, and various utilities can be deleted during the image editing stage. Without such distracting objects, the photo will look cleaner and allow potential buyers to focus their attention entirely on the building or the interior.
| Quick Tip: This step can be done using the Clone Stamp Tool and choosing the source area. To determine the clone source, press Alt-click on Windows or Option-click on Mac. |
11. Sky Replacement
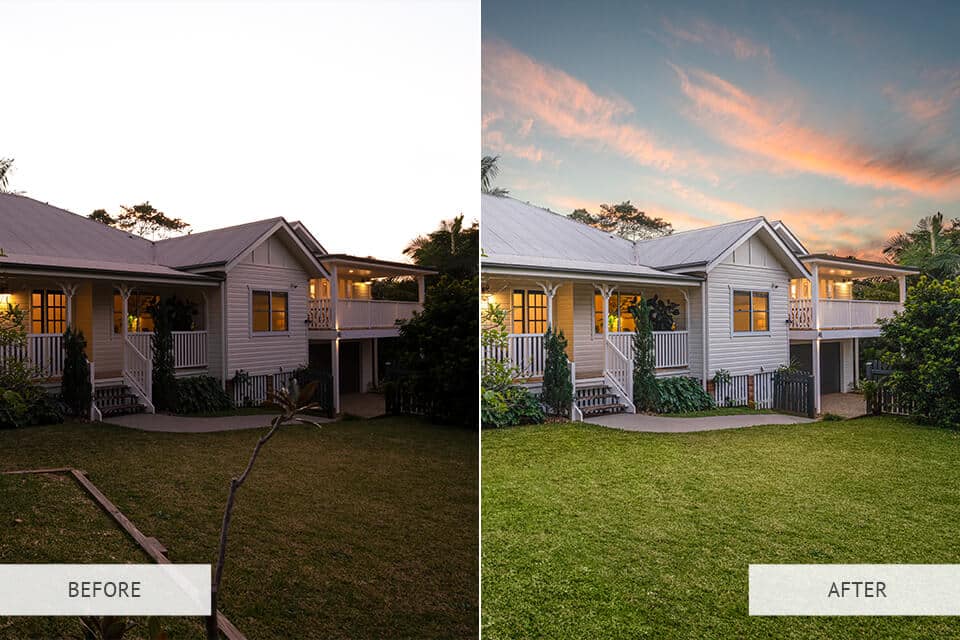
Colors show their full glory on sunny, bright days, as cloudy, stormy weather is the enemy of any professional real estate photographer. Poor weather can make even the most luxurious property look bland and unappealing.
Luckily, you can swap grey, cloudy skies for a vibrant sunny skyscape. Thanks to such manipulation, the property will look like it was shot on a bright summer day, with you being able to choose between a sunrise, sunset, or dawn sky.
12. Retouch the Lawn and Trees
When taking photos of houses, photographers often forget about their immediate surroundings. If you dedicate a bit of your time to them when you edit real estate photos, they can come out looking even more eye-catching.
If you’re missing a lawn around the house, add it, and if the grass that is there doesn’t look good, replace it. Pasting in a couple of trees can also help add life to the scene and attract more potential buyers.
13. Level the Horizon
In addition to keeping all the vertical lines aligned, you have to make all the horizontal ones straight too. If you have an uneven horizon or the entire scene looks slanted, you need to address this issue during the editing stage.
Leaving a crooked horizon line will only confuse potential buyers and make you seem unprofessional. Due to how our brains work, we always perceive the horizon as an even line even if that’s not the case.
If the viewer doesn’t consciously understand that the unevenness is caused by distortion, they will develop a subconscious dislike for the image and its subject.
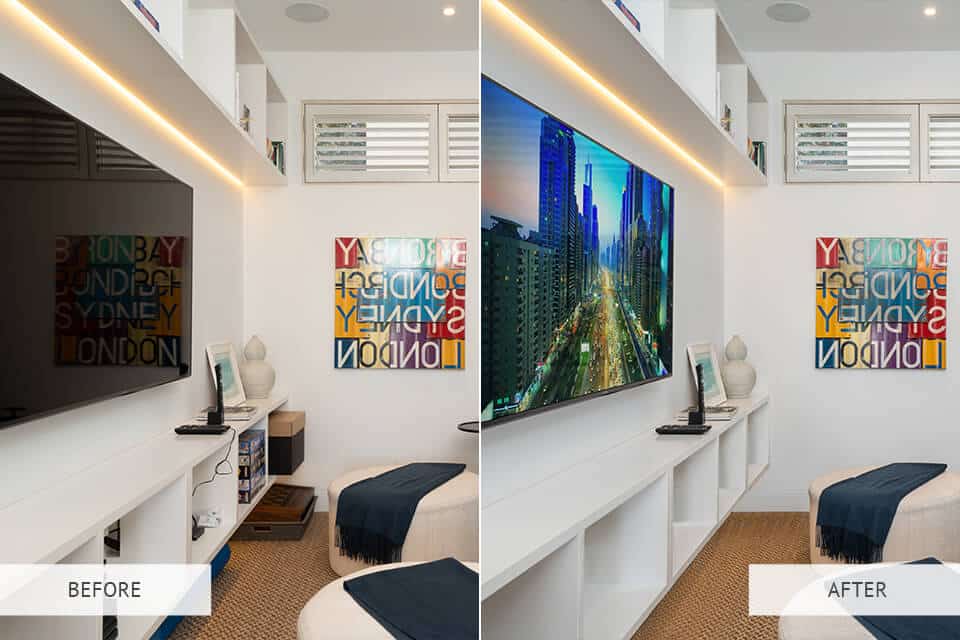
14. Add Minute Details
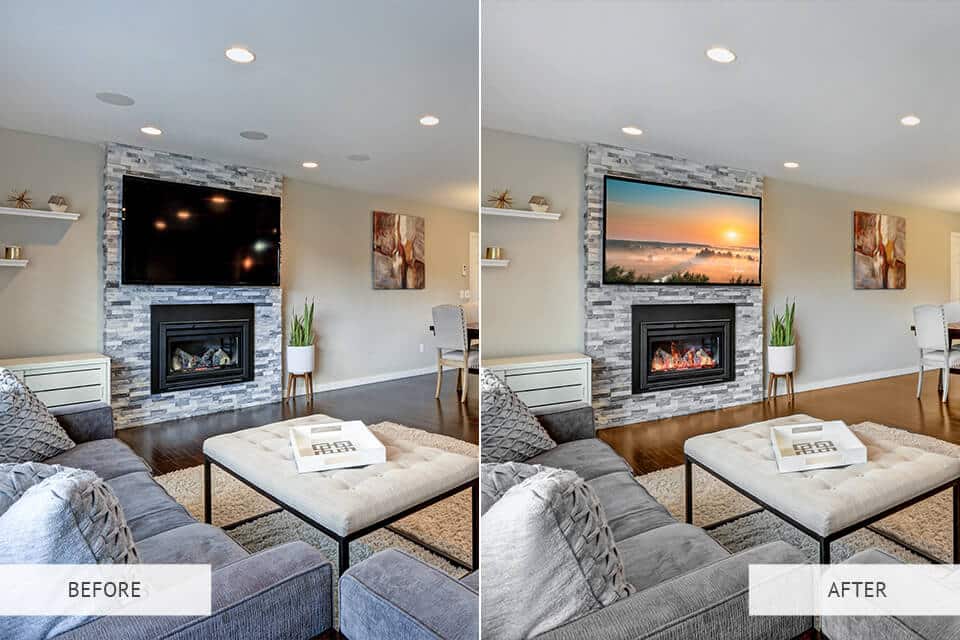
You can introduce some small objects and details to add realism and liveliness to the scene. Otherwise, a vacant room can come across as empty or unfinished, which is not the feeling you want to evoke in the viewer. Several minute details can help better convey how the room can look once the client purchases it.
Popular examples of such details include plants, vases, a modern TV on the wall playing a Netflix series, or a fireplace. All of these elements are great at breathing life into an empty space.
15. Master the HDR Technique
HDR (high dynamic range) is a widely used effect by photographers of most genres due to how it enhances the colors of a photo, making them more vibrant. Most quality cameras come with an HDR mode, taking several shots of the subject at multiple focus points and then combining them to balance out the bright and dark parts of the photo.
16. Learn How to Batch Edit Photos
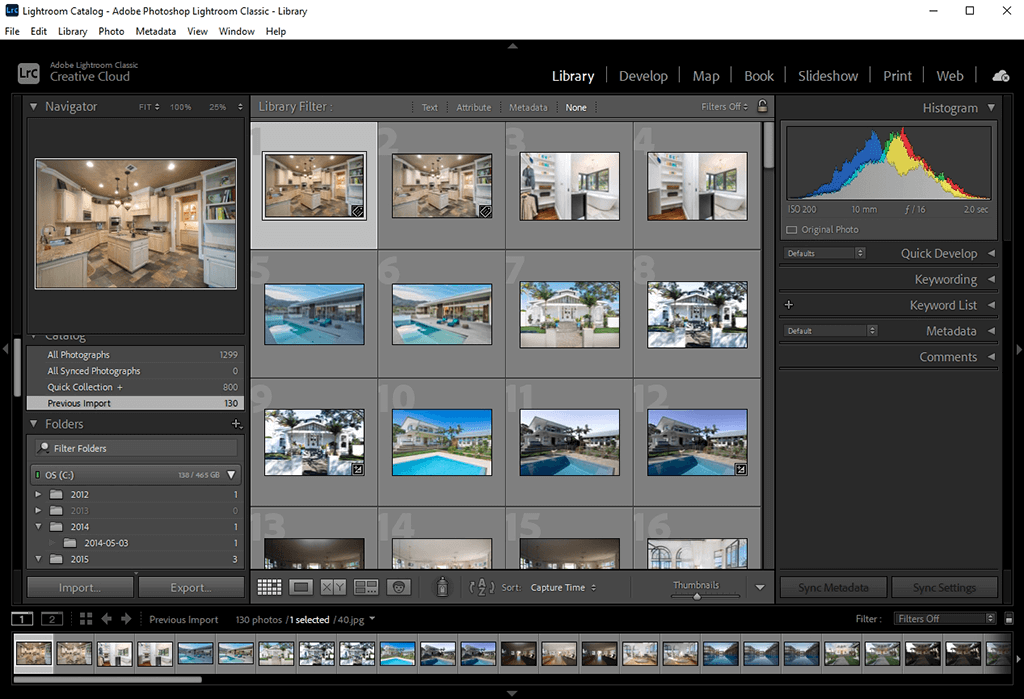
If you’ve dedicated the entire day to a photoshoot in a neighborhood, you can’t go wrong with resorting to batch real estate photo editing in Lightroom. Given you’ve taken multiple photos of the same subject with an identical exposure setting, you can apply the same editing adjustments to all of them to save time.
Other than being able to apply the same changes to a bunch of images in a single click, you can also enhance a single photo and then copy its changes to other pictures by synchronizing them.
| Quick Tip: Pick the photos you want in the Library section by pressing and holding Ctrl, and then using the desired preset on all selected images. Another way to do it is to use a preset on a batch of images when importing them. |
Real Estate Photo Editing: What’s Not Allowed
We’ve already discovered all the main techniques involved in retouching real estate images. However, we’ve also previously noticed that many retouchers go even further and use forbidden methods. So, what is not allowed for real estate photo editing?
1. Replacing the background
Some people want to change the entire background to make the photo look more impressive. For instance, you might feel the desire to replace a smog-covered city skyline, with a tranquil seascape.
Never do such a thing since it misrepresents information about the real estate object while wasting both your time and the time of a potential buyer in the process.
Clients want to see the actual property, including its surroundings, to make an informed decision. Just imagine the shock of the buyer when they learn that the apartment that seemingly had a seaside view faces some skyscrapers.
2. Deleting permanent elements
Removing permanent fixtures like electricity poles, railway tracks, fences, and fire hydrants that are located next to the property is not allowed. Doing so can even lead to you being sued for material misrepresentation. That said, you can take photos from angles that don’t show or minimize the presence of such fixtures in the shot.
3. Special effects and filters
Even though most other photography genres encourage an artistic approach and invite you to experiment with various effects, that isn’t the case in real estate. You shouldn’t even mess around with effects like matte, sepia, black-and-white, or film, limiting image editing to standard color correction.
The photos have to look as realistic as possible to let potential customers examine the property in full detail, as a black-and-white picture might confuse them or make them think you’re hiding something.
4. Unfair presentation
Does one of the walls have a huge hole? Don’t try to fool the buyer by concealing it in the image. You should always present the property in its current condition and as a bonus, you can also provide a retouched photo to the buyer to show how the repaired wall will look without a hole.
Image editing is a crucial part of real estate photography, but you should still carefully consider each edit you’re about to make. If you have the urge to defend a substantial change, then you’ve probably overstepped the boundaries of what’s allowed. Remember that nothing is more important than your reputation so avoid misrepresentation at all costs.
Use a Tool to Post on Your Social Media
Once you’ve uploaded a photo that matches all retouching and size requirements, you should think about how you’re going to handle social media posting moving forward.


 Customizable tone of voice
  Several variations to choose from
  1,000 pre-made AI prompts